
文\曹永忠、吳佳駿、許智誠、蔡英德
本篇承接上上篇『【物聯網系統開發】運用 ARDUINO 乙太網路擴充板建立簡單網頁伺服器』文章(曹永忠, 吳佳駿, 許智誠, & 蔡英德, 2017a)與上篇『【物聯網系統開發】運用 ARDUINO 乙太網路擴充板建立用戶端工具程式』文章(曹永忠, 吳佳駿, 許智誠, & 蔡英德, 2017b)後,我們發現準確、即時、可靠與全球化(可適用於多時區)的時間機制,則是物聯網開發中,不可或缺的一個核心功能。
本文要使用 ARDUINO 乙太網路擴充板,再具備 TCP/IP 之擷取通訊能力之後,我們將使用網路上最通用的 NTP 伺服器(NTP:Network Time Protocol),透過 NTP 通訊協定來取得最即時、正確的時間,讓最方便使用的開發版(曹永忠, 2016a, 2016b, 2016c)。
本系列希望貢獻筆者一些經驗,讓非資訊、電機、電子等 Makers 可以學到在物聯網開發中,一些程式開發的技巧、原理、法則與穩固的技術,因本系列文章主要讀者為初學者,內容程度為基礎入門程度,深入之處不足,但請高手們給筆者賜教,也請讀者關注本系列。
取得網路校時時間資料
首先,組立 W5100 以太網路模組是非常容易的一件事,如下圖所示,只要將 W5100 以太網路模組堆疊到任何 Arduino 開發板之上就可以了。
 ▲圖 1 將 Arduino 開發板與 W5100 以太網路模組堆疊組立
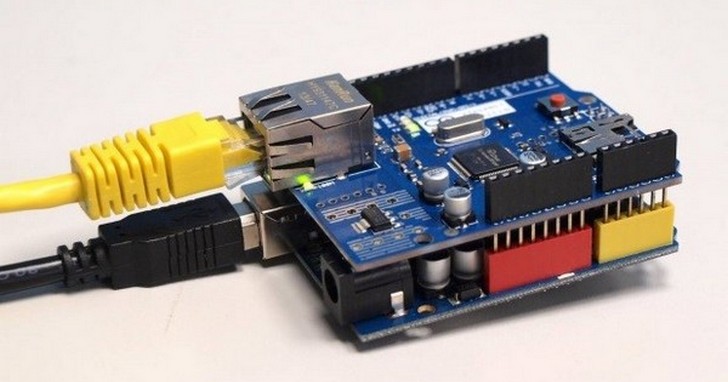
之後,在將組立好的 W5100 以太網路模組,如下圖所示,只要將 USB 線差到 Arduino 開發板,再將 RJ 45的網路線一端插到 W5100 以太網路模組,另一端插到可以上網的集線器(Switch HUB)的任何一個區域網路接口(Lan Port)就可以了。
▲圖 2接上電源與網路線的 W5100 以太網路模組堆疊卡
我們遵照前幾章所述,將 Arduino 開發板的驅動程式安裝好之後,我們打開 Arduino 開發板的開發工具:Sketch IDE 整合開發軟體,攥寫一段程式,如下表所示之網路校時測試程式,我們就可以透過 W5100 以太網路模組堆疊卡取得網路校時時間。
表 1網路校時測試程式
|
網路校時測試程式(UdpNtpClient) |
|
/*
Udp NTP Client
Get the time from a Network Time Protocol (NTP) time server Demonstrates use of UDP sendPacket and ReceivePacket For more on NTP time servers and the messages needed to communicate with them, see http://en.wikipedia.org/wiki/Network_Time_Protocol
created 4 Sep 2010 by Michael Margolis modified 9 Apr 2012 by Tom Igoe
This code is in the public domain.
*/
#include <SPI.h> #include <Ethernet.h> #include <EthernetUdp.h>
// Enter a MAC address for your controller below. // Newer Ethernet shields have a MAC address printed on a sticker on the shield byte mac[] = { 0xAA, 0xBB, 0xCC, 0xDD, 0xEE, 0xFF }; IPAddress ip(192, 168, 30, 200); IPAddress dnServer(168, 95, 1, 1); // the router's gateway address: IPAddress gateway(192, 168, 30, 254); // the subnet: IPAddress subnet(255, 255, 255, 0);
unsigned int localPort = 8888; // local port to listen for UDP packets
char timeServer[] = "time.nist.gov"; // time.nist.gov NTP server
const int NTP_PACKET_SIZE = 48; // NTP time stamp is in the first 48 bytes of the message
byte packetBuffer[ NTP_PACKET_SIZE]; //buffer to hold incoming and outgoing packets
// A UDP instance to let us send and receive packets over UDP EthernetUDP Udp;
void setup() { // Open serial communications and wait for port to open: Serial.begin(9600); while (!Serial) { ; // wait for serial port to connect. Needed for Leonardo only }
// start Ethernet and UDP if (Ethernet.begin(mac) == 0) { Serial.println("Failed to configure Ethernet using DHCP"); // no point in carrying on, so do nothing forevermore: Ethernet.begin(mac, ip, dnServer, gateway, subnet);
} Udp.begin(localPort); }
void loop() { sendNTPpacket(timeServer); // send an NTP packet to a time server
// wait to see if a reply is available delay(1000); if ( Udp.parsePacket() ) { // We've received a packet, read the data from it Udp.read(packetBuffer, NTP_PACKET_SIZE); // read the packet into the buffer
//the timestamp starts at byte 40 of the received packet and is four bytes, // or two words, long. First, esxtract the two words:
unsigned long highWord = word(packetBuffer[40], packetBuffer[41]); unsigned long lowWord = word(packetBuffer[42], packetBuffer[43]); // combine the four bytes (two words) into a long integer // this is NTP time (seconds since Jan 1 1900): unsigned long secsSince1900 = highWord << 16 | lowWord; Serial.print("Seconds since Jan 1 1900 = " ); Serial.println(secsSince1900);
// now convert NTP time into everyday time: Serial.print("Unix time = "); // Unix time starts on Jan 1 1970. In seconds, that's 2208988800: const unsigned long seventyYears = 2208988800UL; // subtract seventy years: unsigned long epoch = secsSince1900 - seventyYears; // print Unix time: Serial.println(epoch);
// print the hour, minute and second: Serial.print("The UTC time is "); // UTC is the time at Greenwich Meridian (GMT) Serial.print((epoch % 86400L) / 3600); // print the hour (86400 equals secs per day) Serial.print(':'); if ( ((epoch % 3600) / 60) < 10 ) { // In the first 10 minutes of each hour, we'll want a leading '0' Serial.print('0'); } Serial.print((epoch % 3600) / 60); // print the minute (3600 equals secs per minute) Serial.print(':'); if ( (epoch % 60) < 10 ) { // In the first 10 seconds of each minute, we'll want a leading '0' Serial.print('0'); } Serial.println(epoch % 60); // print the second } // wait ten seconds before asking for the time again delay(10000); }
// send an NTP request to the time server at the given address unsigned long sendNTPpacket(char* address) { // set all bytes in the buffer to 0 memset(packetBuffer, 0, NTP_PACKET_SIZE); // Initialize values needed to form NTP request // (see URL above for details on the packets) packetBuffer[0] = 0b11100011; // LI, Version, Mode packetBuffer[1] = 0; // Stratum, or type of clock packetBuffer[2] = 6; // Polling Interval packetBuffer[3] = 0xEC; // Peer Clock Precision // 8 bytes of zero for Root Delay & Root Dispersion packetBuffer[12] = 49; packetBuffer[13] = 0x4E; packetBuffer[14] = 49; packetBuffer[15] = 52;
// all NTP fields have been given values, now // you can send a packet requesting a timestamp: Udp.beginPacket(address, 123); //NTP requests are to port 123 Udp.write(packetBuffer, NTP_PACKET_SIZE); Udp.endPacket(); }
|
如下圖所示,讀者可以看到本次實驗-網路校時測試程式結果畫面。
▲圖 3網路校時測試程式結果畫面
後續
本篇為『物聯網系統開發系列』系列之準確掌握即時正確的時間,主要內容是要讓讀者使用創客神器 Arduino 開發板,透過乙太網路擴充板(Ethernet Shield)的網際網路連線之強大功能,可以讓 Arduino 開發板取得 NTP 伺服器之時間內容,進而將這個基礎理念與技術,進階運用到雲端平台中時間同步與校正的機制,進而在物聯網開發中,成為一個技術的核心能力,乃是筆者本篇內容想傳達的創作概念。
筆者本系列是針對非資訊、電機、電子等 Makers 攥寫的物聯網系統開發系列,這四、五年來在物聯網系統開發領域寫書、發表文章、辦展、授課,常遇到許多學子訓練不足,以交作業的心態來學習,並沒有把程式底子打好。
後續筆者還會繼續發表『物聯網系統開發系列』系列的文章,在未來我們可以創造出更優質,更具未來性的物聯網(Internet of Thing:IOT)產品開發相關技術。
敬請期待更多的文章。
作者介紹
|
曹永忠 (Yung-Chung Tsao) ,目前為自由作家暨專業Maker,專研於軟體工程、軟體開發與設計、物件導向程式設計,商品攝影及人像攝影。長期投入創客運動、資訊系統設計與開發、企業應用系統開發、軟體工程、新產品開發管理、商品及人像攝影等領域,並持續發表作品及相關專業著作。 Email:prgbruce@gmail.com Line ID:dr.brucetsao
作者網站:https://www.cs.pu.edu.tw/~yctsao/ 臉書社群(Arduino.Taiwan):https://www.facebook.com/groups/Arduino.Taiwan/ Github網站:https://github.com/brucetsao/ 吳佳駿 (Chia-Chun Wu),國立中興大學資訊科學與工程學系博士,現任教於國立金門大學工業工程與管理學系專任助理教授,目前兼任國立金門大學計算機與網路中心資訊網路組組長,主要研究為軟體工程與應用、行動裝置程式設計、物件導向程式設計、網路程式設計、動態網頁資料庫、資訊安全與管理。 Email: ccwu0918@nqu.edu.tw 許智誠 (Chih-Cheng Hsu),美國加州大學洛杉磯分校(UCLA) 資訊工程系博士,曾任職於美國IBM等軟體公司多年,現任教於中央大學資訊管理學系專任副教授,主要研究為軟體工程、設計流程與自動化、數位教學、雲端裝置、多層式網頁系統、系統整合。 Email: khsu@mgt.ncu.edu.tw 蔡英德 (Yin-Te Tsai),國立清華大學資訊科學系博士,目前是靜宜大學資訊傳播工程學系教授、靜宜大學計算機及通訊中心主任,主要研究為演算法設計與分析、生物資訊、軟體開發、視障輔具設計與開發。 Email:yttsai@pu.edu.tw |
參考文獻:
曹永忠. (2016a). AMEBA透過網路校時RTC時鐘模組. 智慧家庭. Retrieved from http://makerpro.cc/2016/03/using-ameba-to-develop-a-timing-controlling-device-via-internet/
曹永忠. (2016b). 智慧家庭:PM2.5空氣感測器(上網篇:啟動網路校時功能). 智慧家庭. Retrieved from https://vmaker.tw/archives/7305
曹永忠. (2016c). 智慧家庭實作:ARDUINO 永遠的時間靈魂-RTC時鐘模組. 智慧家庭. Retrieved from http://www.techbang.com/posts/40838
曹永忠, 吳佳駿, 許智誠, & 蔡英德. (2017a). 【物聯網系統開發】運用 ARDUINO 乙太網路擴充板建立簡單網頁伺服器. 智慧家庭. Retrieved from http://www.techbang.com/posts/51518-internet-system-using-arduino-ethernet-add-on-board-to-build-a-simple-web-server
曹永忠, 吳佳駿, 許智誠, & 蔡英德. (2017b). 蔡英德,【物聯網系統開發】運用 ARDUINO 乙太網路擴充板建立用戶端工具程式. 智慧家庭. Retrieved from http://www.techbang.com/posts/52039-internet-system-development-established-client-tools-using-arduino-ethernet-add-on-board-procedures
曹永忠, 許智誠, & 蔡英德. (2015). 創客神器ARDUINO到底是什麼呢?. Retrieved from http://makerdiwo.com/archives/1893

請注意!留言要自負法律責任,相關案例層出不窮,請慎重發文!