
由於人類不斷破壞地球資源,大氣層的溫室效應越來越嚴重,家中許多長者,面對酷熱的天氣變化無常,常會引起疾病,在前一篇內容就有介紹使用數位化的DS18B20溫度感測器來偵測溫度,但是溫度與濕度常常是一體兩面的東西,在濕度太高時,家中年長者又會引發風濕痛,所以如果可以一併得到溫濕度的資訊,那該有多好。為了完成我們的心願,我們使用了整合型的DHx溫濕度感測模組來告訴我們溫度與濕度的資訊。
文\曹永忠、許智誠、蔡英德
溫濕度控制
目前市面上的感測器很多種,例如圖示的Dallas DS18B20 溫度感測器和DHT11溫濕度感測器等等…,種類非常多種,但是我們並非使用在數百度的高溫場所,我們大部份皆使用在一般市溫場所的溫度感測器。
我們如果要可以兼備溫度與濕度量測的功能,那麼就必須採用DHT11溫濕度感測器,因為DHT11溫濕度感測器本身就具備溫度與溼度兩種感測器的功能。
|
▲ Dallas DS18B20 溫度感測器 |
▲ DHT11溫濕度感測器 |
DHT11溫濕度感測模組
為了讓Arduino開發板簡化使用,我們使用了DHT11溫濕度感測模組,本模組只要將Vcc接到Arduino開發板+5V腳位,Gnd接到Arduino開發板Gnd腳位,DataVcc接到Arduino開發板Digital Input 腳位2,接腳圖可參考表1之Arduino開發板外部插斷接腳圖,詳細內容請參考(https://www.arduino.cc/en/Reference/AttachInterrupt),並執行下列程式,若網友想要自行組立DHT11溫濕度感測器的線路,可以參考圖示的DHT11溫濕度感測器與單晶片開發板連接線路圖。

▲ DHT11溫濕度感測模組
表 1 Arduino開發板外部插斷接腳圖
|
Board |
int.0 |
int.1 |
int.2 |
int.3 |
int.4 |
int.5 |
|
Uno,Ethernet |
2 |
3 |
|
|
|
|
|
Mega2560 |
2 |
3 |
21 |
20 |
19 |
18 |
|
Leonardo |
3 |
2 |
0 |
1 |
7 |
|
表 2 DHT11溫濕度感測模組接腳圖
|
DHT11溫濕度感測模組 |
Arduino開發板接腳 |
解說 |
|
Data |
Arduino digital Input pin 2 |
DHT11資料輸出腳位 |
|
5V |
Arduino pin 5V |
5V 陽極接點 |
|
GND |
Arduino pin Gnd |
共地接點 |
其餘關於DHT11溫濕度感測器的細部資料,本篇使用的DHT-11函式庫,是採用網路上Nicolas(niesteszeck@gmail.com)針對DHT11 Temperature and Humidity Sensor所撰寫的Arduino library,Nicolas在GitHub, Inc.撰寫之程式碼(GitHub, 2013),其下載網址為:https://github.com/niesteszeck/idDHT11 ,特此感謝分享。
▲ DHT11溫濕度感測器與單晶片開發板連接線路簡圖
DHT11溫濕度感測器讀取溫濕度測試程式,參考Nicolas(niesteszeck@gmail.com)針對DHT11 Temperature and Humidity Sensor所撰寫的Arduino librar,其中所附的範例程式idDHT11_Lib_example所改寫得程式,其下載網址為:https://github.com/niesteszeck/idDHT11,特此感謝分享。
表 3 DHT11溫濕度感測器讀取溫濕度測試程式
|
DHT11溫濕度感測器讀取溫濕度測試程式(DHT_11_test1) |
|
/* Board int.0 int.1 int.2 int.3 int.4 int.5 Uno, Ethernet 2 3 Mega2560 2 ZX 3 21 20 19 18 Leonardo 3 2 0 1 Due (any pin, more info http://arduino.cc/en/Reference/AttachInterrupt)
This example, as difference to the other, make use of the new method acquireAndWait() */ // use digital pin 2 to connect DHT-11 data pin
#include <idDHT11.h>
int idDHT11pin = 2; //Digital pin for comunications int idDHT11intNumber = 0; //interrupt number (must be the one that use the previus defined pin (see table above)
//declaration void dht11_wrapper(); // must be declared before the lib initialization
// Lib instantiate idDHT11 DHT11(idDHT11pin,idDHT11intNumber,dht11_wrapper);
void setup() { Serial.begin(9600); Serial.println("idDHT11 Example program"); Serial.print("LIB version: "); Serial.println(IDDHT11LIB_VERSION); Serial.println("---------------"); } // This wrapper is in charge of calling // mus be defined like this for the lib work void dht11_wrapper() { DHT11.isrCallback(); } void loop() { Serial.print("\nRetrieving information from sensor: "); Serial.print("Read sensor: "); //delay(100);
int result = DHT11.acquireAndWait(); switch (result) { case IDDHTLIB_OK: Serial.println("OK"); break; case IDDHTLIB_ERROR_CHECKSUM: Serial.println("Error\n\r\tChecksum error"); break; case IDDHTLIB_ERROR_TIMEOUT: Serial.println("Error\n\r\tTime out error"); break; case IDDHTLIB_ERROR_ACQUIRING: Serial.println("Error\n\r\tAcquiring"); break; case IDDHTLIB_ERROR_DELTA: Serial.println("Error\n\r\tDelta time to small"); break; case IDDHTLIB_ERROR_NOTSTARTED: Serial.println("Error\n\r\tNot started"); break; default: Serial.println("Unknown error"); break; } Serial.print("Humidity (%): "); Serial.println(DHT11.getHumidity(), 2);
Serial.print("Temperature (oC): "); Serial.println(DHT11.getCelsius(), 2);
Serial.print("Temperature (oF): "); Serial.println(DHT11.getFahrenheit(), 2);
Serial.print("Temperature (K): "); Serial.println(DHT11.getKelvin(), 2);
Serial.print("Dew Point (oC): "); Serial.println(DHT11.getDewPoint());
Serial.print("Dew Point Slow (oC): "); Serial.println(DHT11.getDewPointSlow());
delay(2000); } |
參考資料來源:https://github.com/niesteszeck/idDHT11
由上述程式執行後,可以見圖示DHT11溫濕度感測器讀取溫濕度測試程式畫面結果,也可以輕易讀到外界的溫度與濕度了。
▲ DHT11溫濕度感測器讀取溫濕度測試程式畫面結果
DHT22溫濕度感測模組
本實驗為了讓Arduino開發板進階使用,使用了更進階的的DHT22溫濕度感測模組如圖示所示,本模組只要將Vcc接到Arduino開發板+5V腳位,Gnd接到Arduino開發板Gnd腳位,DAT接到Arduino開發板Digital Input 腳位2,接腳圖見表4 Arduino開發板外部插斷接腳圖,詳細內容請參閱http://arduino.cc/en/Reference/AttachInterrupt),並執行下列程式。
▲ DHT22溫濕度感測模組
表 4 DHT22溫濕度感測模組接腳圖
|
DHT22溫濕度感測模組 |
Arduino開發板接腳 |
解說 |
|
DAT |
Arduino digital Input pin 2 |
DHT22資料輸出腳位 |
|
5V |
Arduino pin 5V |
5V 陽極接點 |
|
GND |
Arduino pin Gnd |
共地接點 |
其餘關於DHT22溫濕度感測器的細部資料,本篇使用的DHT-22函式庫,是採用網路上Seeed-Studio針對DHT22 Temperature and Humidity Sensor所撰寫的Arduino library,Seeed-Studio在GitHub, Inc.撰寫之程式碼,其下載網址為:https://github.com/Seeed-Studio/Grove_Temperature_And_Humidity_Sensor,特此感謝分享。
我們將表 5之DHT22溫濕度感測器讀取溫濕度測試程式撰寫好之後,編譯完成後上傳到Arduino開發板,
表 5 DHT22溫濕度感測器讀取溫濕度測試程式
|
DHT22溫濕度感測器讀取溫濕度測試程式(DHT_22_test1) |
|
// Example testing sketch for various DHT humidity/temperature sensors // Written by ladyada, public domain
#include "DHT.h"
#define DHTPIN 2 // what pin we're connected to
// Uncomment whatever type you're using! //#define DHTTYPE DHT11 // DHT 11 #define DHTTYPE DHT22 // DHT 22 (AM2302) //#define DHTTYPE DHT21 // DHT 21 (AM2301)
// Connect pin 1 (on the left) of the sensor to +5V // Connect pin 2 of the sensor to whatever your DHTPIN is // Connect pin 4 (on the right) of the sensor to GROUND // Connect a 10K resistor from pin 2 (data) to pin 1 (power) of the sensor
DHT dht(DHTPIN, DHTTYPE);
void setup() { Serial.begin(9600); Serial.println("DHTxx test!");
dht.begin(); }
void loop() { // Reading temperature or humidity takes about 250 milliseconds! // Sensor readings may also be up to A0 seconds 'old' (its a very slow sensor) float h = dht.readHumidity(); float t = dht.readTemperature();
// check if returns are valid, if they are NaN (not a number) then something went wrong! if (isnan(t) || isnan(h)) { Serial.println("Failed to read from DHT"); } else { Serial.print("Humidity: "); Serial.print(h); Serial.print(" %\t"); Serial.print("Temperature: "); Serial.print(t); Serial.println(" *C"); } } |
參考資料來源:Grove- Temperature and Humidity Sensor
(http://www.seeedstudio.com/wiki/Grove-_Temperature_and_Humidity_Sensor)
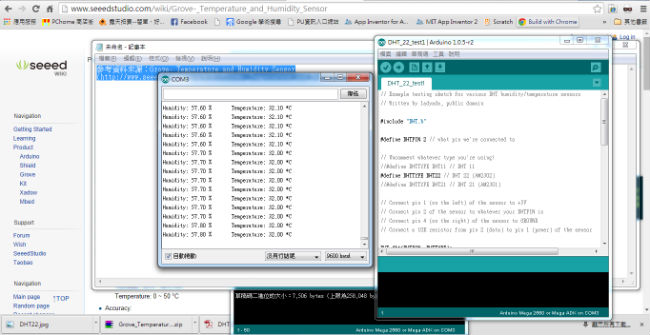
上述程式執行後,可以見到圖示DHT22溫濕度感測器讀取溫濕度測試程式畫面結果,也可以輕易讀到外界的溫度與濕度了。
▲ DHT22溫濕度感測器讀取溫濕度測試程式畫面結果
作者介紹
|
曹永忠 (Yung-Chung Tsao):目前為自由作家、台灣資訊傳播學會秘書長,專研於軟體工程、軟體開發與設計、物件導向程式設計,商品攝影及人像攝影。長期投入資訊系統設計與開發、企業應用系統開發、軟體工程、新產品開發管理、商品及人像攝影等領域,並持續發表作品及相關專業著作。 Email:prgbruce@gmail.com ,Line ID:dr.brucetsao Arduino部落格:http://taiwanarduino.blogspot.tw/ 範例原始碼網址:https://github.com/brucetsao/arduino_RFProgramming 臉書社群(Arduino.Taiwan):https://www.facebook.com/groups/Arduino.Taiwan/ Arduino活動官網:http://arduino.kktix.cc/ Youtube:https://www.youtube.com/channel/UCcYG2yY_u0m1aotcA4hrRgQ |

請注意!留言要自負法律責任,相關案例層出不窮,請慎重發文!